
Automating Your Inbox Placement Tests
When you rely on email for your business or your clients, monitoring deliverability shouldn't be a manual chore you have to remember to do every week. The Automatic Tests feature takes the hassle out of checking your inbox placement by putting the entire process on autopilot.
Instead of manually generating a Test ID, inserting it into your email, and sending a campaign to a seed list every time you want to check your reputation, this feature allows you to set up recurring tests seamlessly. By connecting directly to your sending server (SMTP), you simply send a sample email to a unique setup address, configure your schedule, choose your email providers, and let the system run tests in the background. It will even send you automatic alerts if your spam score reaches a concerning level.
How to Set Up an Automatic Test
Setting up an automated test involves linking your email server, initializing the email content, and then configuring your schedule and alerts.
Step 1: Adding a Sender Account
Before you can run an automated test, you must authorize Unspam.email to connect to your sending server. You do this by configuring a "Sender Account" using your SMTP credentials (usually provided by your email host, such as SendGrid, Mailgun, Amazon SES, or Google Workspace).
- Log in to your Unspam.email account.
-
In the left sidebar, click on Automatic Tests.
Click the Edit Sender Accounts button.
Click Create New Sender Account.
The Create Sender Account form will appear. Fill in your specific SMTP details:
- Account Name: Give this connection a nickname (e.g., "Marketing Newsletter SMTP").
- From Name: The display name recipients will see (e.g., "Jane at Unspam.email").
- From Email: The authorized sending email address (e.g.,
newsletter@unspam.email). - SMTPHost: The server address provided by your email host (e.g.,
smtp.mailgun.org). - Port: The connection port required by your host, usually 465, 587, or 25.
- Security: Select the encryption type your server requires (SSL, TLS, or STARTTLS).
- SMTP Username: The login username provided by your SMTP host.
- SMTP Password: The secure password or app-specific password tied to your SMTP username.
- Save your settings. Your Sender Account is now successfully linked.

Step 2: Initializing the Test Content
Next, you need to tell the system exactly what email campaign you want it to monitor.
- Navigate back to the Automatic Tests page and click the Start New Test button.
- A pop-up titled Start New Automatic Test will appear, displaying a unique test email address.
-
Click Copy to copy this unique address. The screen will transition to a "Waiting for your email…" status/
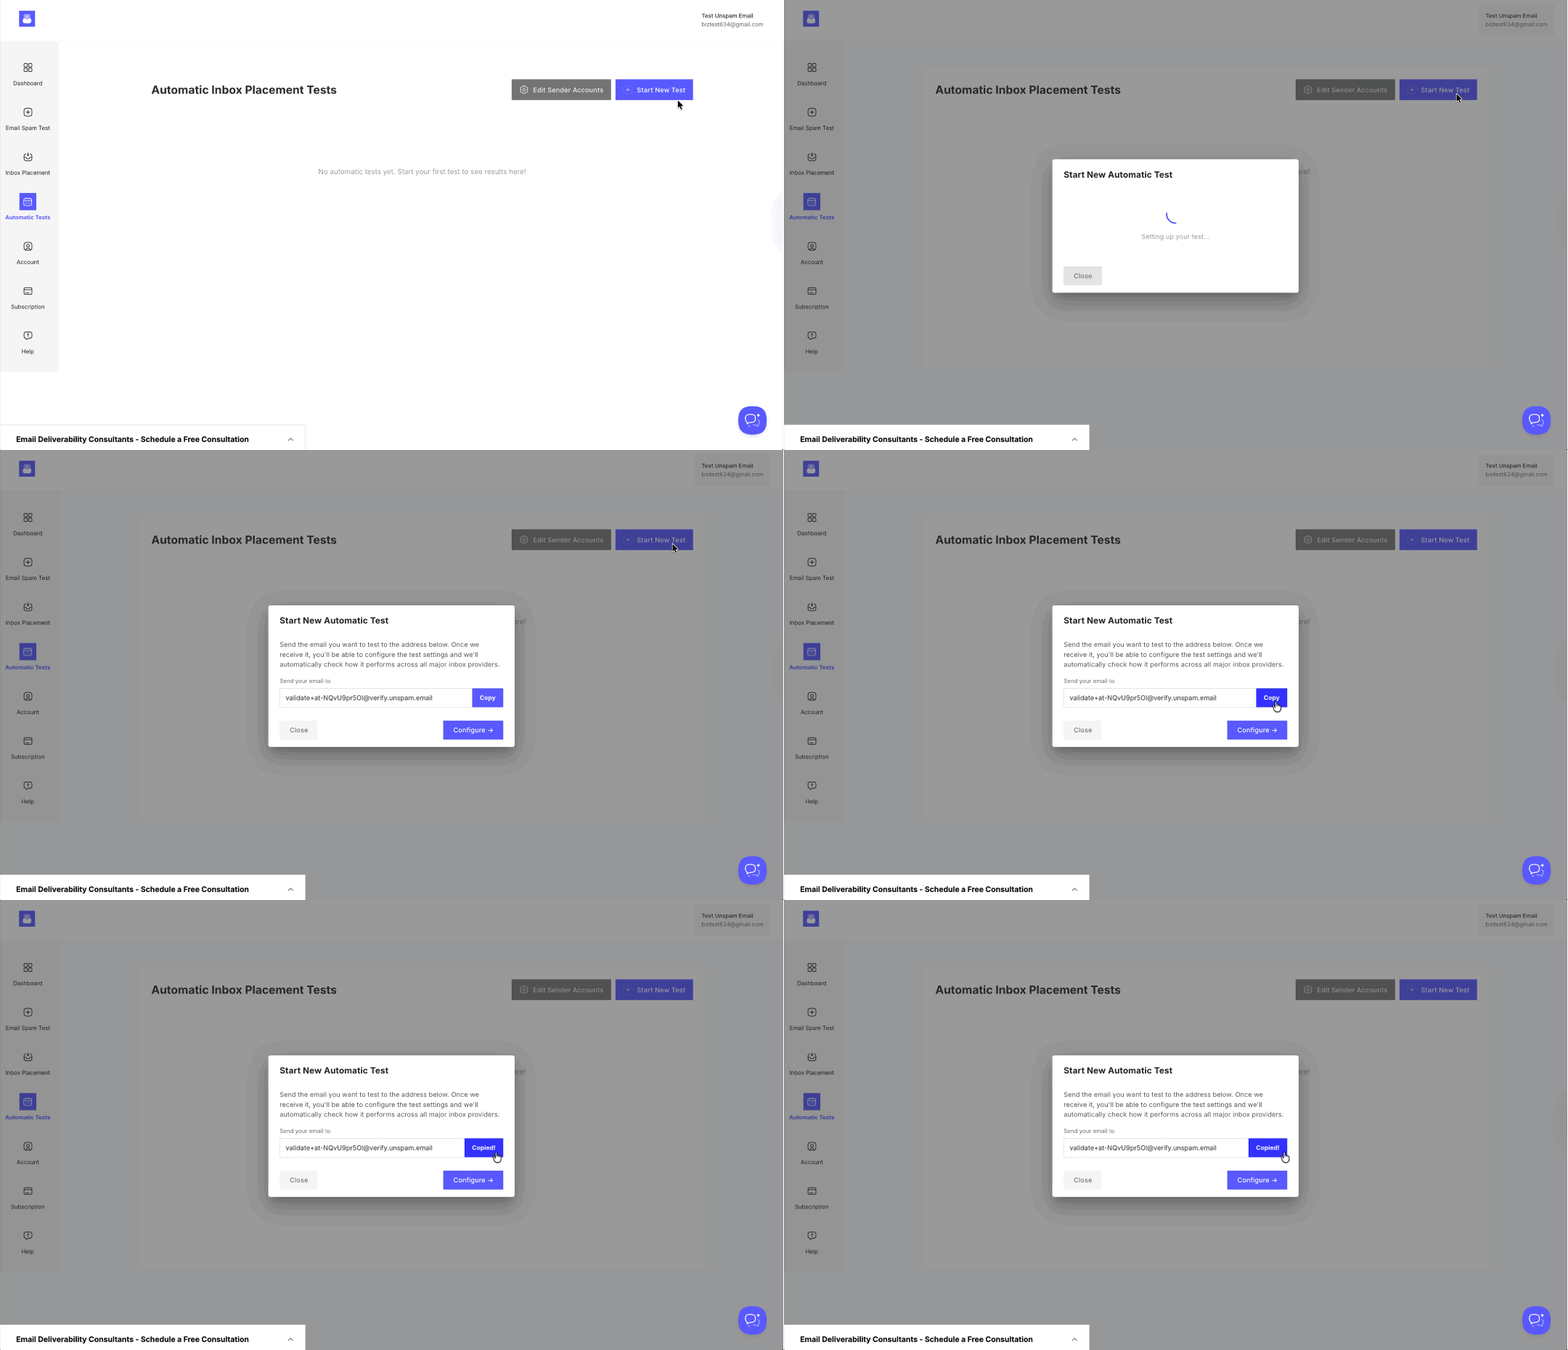
- Open your email marketing platform, create the email campaign you want to monitor, and send a live sample to the address you just copied.
- Return to your Unspam.email dashboard. Click Configure. Once our system receives your sample email, it will redirect to the Automatic Inbox Testing configuration panel.

Step 3: Configure Your Test Settings
Now that the system has captured your email content, you need to configure how and when it should run the automated tests.
- Set the General Settings:
- Test Name: Give your test a clear, recognizable name.
- Sending Account: Use the dropdown menu to select the Sender Account you created in Step 1.
- Choose Email Providers: Select the specific inbox providers you want to test against by checking the boxes. Options include: Amazon WorkMail (Business), AOL, GMX, Google Gmail, Google Workspace (Business), Outlook, Outlook (Business), ProtonMail, Yahoo, Zoho, and Zoho (Business).
- Set the Schedule:
- Status: Keep it set to Active to run the schedule, or switch to Disabled if you need to pause it.
- Start Date & Time (UTC): Choose exactly when the first test should begin.
- Repeat: Set the frequency of your automated tests (Monthly, Weekly, Daily, or Specific days of week).
- Set the Notifications:
- Send notification to: Enter the email address(es) where you want to receive alerts.
- Alert trigger: Choose to be alerted on Every run, or select Spam score greater than to only notify you when the score passes a certain threshold (e.g., higher than 3.0).
- Save your configuration. Your automated test is now fully set up and will run on schedule!

Viewing and Managing Your Automatic Tests
Once you have tests running, the Automatic Tests page serves as your command center. Instead of digging through menus, you get a clear, high-level overview of all your scheduled monitoring.
For each automatic test you have set up, you will see a summary card displaying the following key information:
- Thumbnail: A visual preview of the email being tested so you can easily identify the campaign at a glance.
- Test Name: The custom name you assigned to the test.
- Sender Service: The specific SMTP sending account linked to this test.
- From Email: The authorized sender address being used.
- Status: Shows if your test schedule is currently Active or Disabled.
- Spam Rate: A quick percentage showing how often that specific email is hitting the spam folder across your selected providers.
- Last Run: The exact date and time the test was most recently completed.
- Runs Next: The scheduled date and time for the next automated test to begin.
Accessing the Test Report
Clicking View Report opens a comprehensive dashboard detailing the results of the latest automated run, including:
- Placement Breakdown: A provider-by-provider breakdown showing exactly where your email landed (Inbox, Spam, or Missing) for networks like Gmail, Yahoo, and Outlook.
- Authentication Status: A verification check of your SPF, DKIM, and DMARC records to ensure your sender identity is properly authenticated.
- Spam Filter Analysis: Detailed feedback on technical spam scores (such as SpamAssassin) highlighting any specific penalties or formatting issues holding your deliverability back.
- Historical Trends: A log of previous automated runs, allowing you to track your sender reputation and spot negative trends before they impact your primary campaigns.
